In this article, I will show you a web application with Spring Boot and Thymeleaf example but first of all, let’s see what is Spring Boot and how it helps in the development of Spring Framework based web application development.
Introduction
A Spring Boot is a new framework by team Pivotal, designed and aimed to simplify the bootstrapping and development of new Spring application. This framework takes an opinionated view to configuration and frees the developer from the need of defining the configuration.
The developer has been criticizing Spring Framework over the years because it has so many configurations to start a new development. Finally, Spring Boot is what all Spring developers have been waiting for years. It actually makes it easy to create spring-powered, production-grade applications and services with the absolute minimum fuss. You can use Spring Boot with spring framework as a rapid application development platform with various components of spring. Also, it has the ability to package your application as a runnable jar, which includes an embedded tomcat (or jetty) server.
It really reduces boilerplate configuration providing you the shortest way to have a Spring web application up and running. So, in short, it simplifies your spring dependencies, no more version collision.
Now we know what Spring Boot is? and what are its capabilities?, let’s start building a web application using Spring Boot, Thymeleaf template engine + embedded Tomcat and package as an executable JAR file.
Prerequisite
For the purpose of building the web application with Spring Boot and Thymeleaf example, we will be using the following:
- Eclipse IDE Oxygen Release (4.7.0)
- Spring STS tool (install it from Eclipse Marketplace)
- Spring Boot 1.5.4.RELEASE
- Thymeleaf 2.1.5.RELEASE
- Tomcat Embedded 8.5.15
- Apache Maven 3.5
- Java 8
In order to follow along with the Spring Boot and Thymeleaf example, you should have JDK 8, Eclipse and Maven installed on your computer. If you are missing any of these tools you use the link below to download and install them now.
- Eclipse IDE for Windows, Mac, and Linux
- Apache Maven for Windows, Mac, and Linux
- JDK 8 for Windows, Mac and Linux
Download Source code
Download Source code for the tutorial
Creating Spring Boot and Thymeleaf example web application
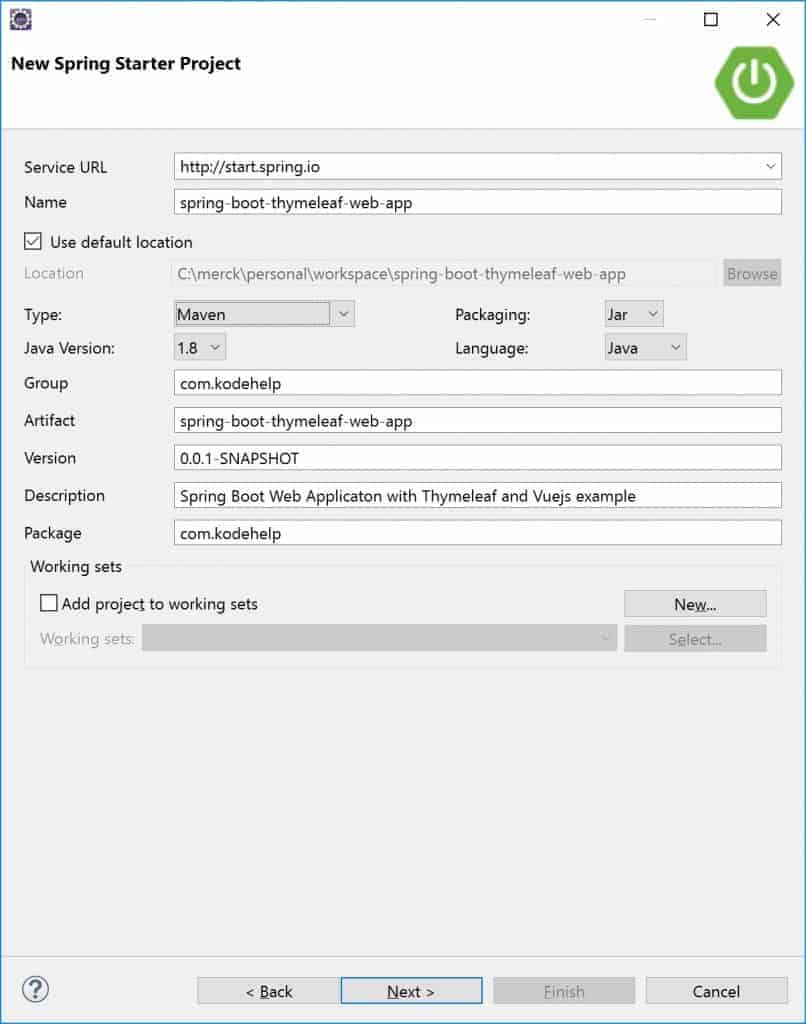
Step 1 : Create Spring Boot Starter Project in eclipse
- Create new Spring Starter Project by clicking File –> Other –> Spring Boot –> Spring Starter Project
- Enter Project Name
- Select Type as Maven, Packaging as Jar and enter Maven pom.xml details as show in the below image.
- Click Next
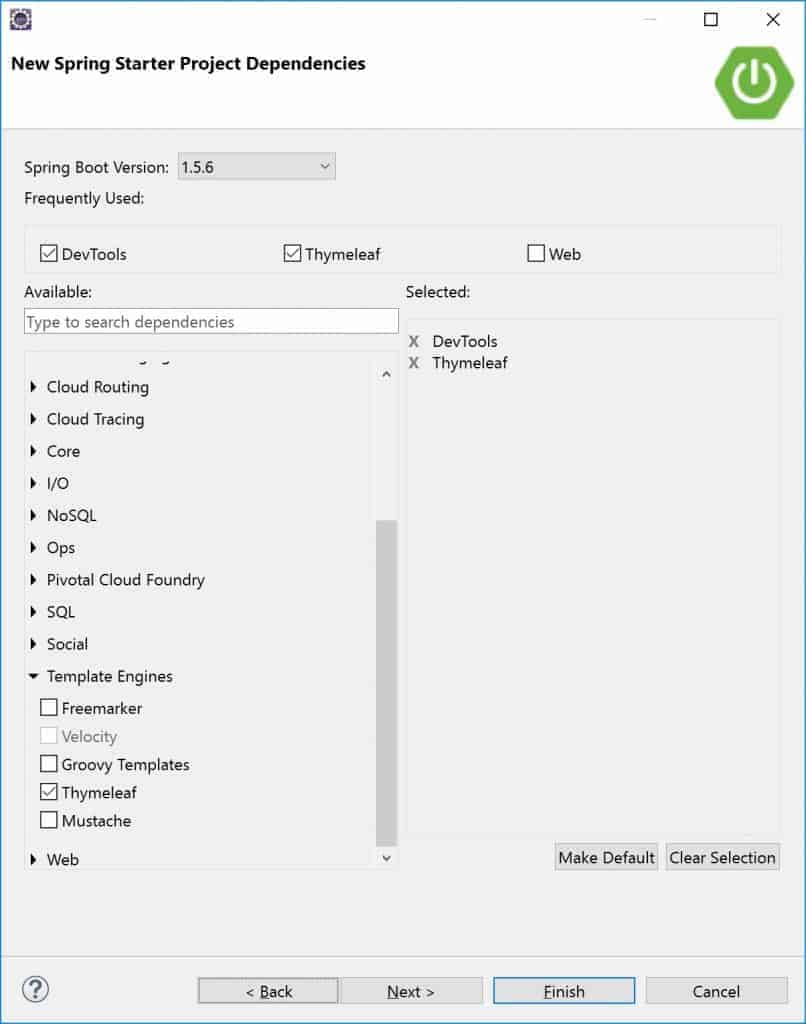
Step 2: Add Project Dependencies
- On the New Spring Starter Project Dependencies screen, select the appropriate Spring Boot Version. I have selected Spring Boot version 1.5.6.
- Delete Thymeleaf dependency from Template Engines option
- Select Dev Tools dependencies. I will explain the usage of Dev Tool below down the line in this article.
- Click Next –> Finish
- See the below screenshot for reference.
After adding project dependencies, the final maven pom.xml will look as show below:
<?xml version="1.0" encoding="UTF-8"?>
<project xmlns="http://maven.apache.org/POM/4.0.0" xmlns:xsi="http://www.w3.org/2001/XMLSchema-instance"
        xsi:schemaLocation="http://maven.apache.org/POM/4.0.0 http://maven.apache.org/xsd/maven-4.0.0.xsd">
    <modelVersion>4.0.0</modelVersion>
    <groupId>com.kodehelp</groupId>
    <artifactId>spring-boot-thymeleaf-web-app</artifactId>
    <version>0.0.1-SNAPSHOT</version>
    <packaging>jar</packaging>
    <name>spring-boot-thymeleaf-web-app</name>
    <description>Spring Boot Web Applicaton with Thymeleaf Template Engine</description>
    <parent>
        <groupId>org.springframework.boot</groupId>
        <artifactId>spring-boot-starter-parent</artifactId>
        <version>1.5.6.RELEASE</version>
        <relativePath />
    </parent>
    <properties>
        <project.build.sourceEncoding>UTF-8</project.build.sourceEncoding>
        <project.reporting.outputEncoding>UTF-8</project.reporting.outputEncoding>
        <java.version>1.8</java.version>
    </properties>
    <dependencies>
        <dependency>
            <groupId>org.springframework.boot</groupId>
            <artifactId>spring-boot-starter-thymeleaf</artifactId>
        </dependency>
        <dependency>
            <groupId>org.springframework.boot</groupId>
            <artifactId>spring-boot-devtools</artifactId>
            <scope>runtime</scope>
        </dependency>
        <dependency>
            <groupId>org.springframework.boot</groupId>
            <artifactId>spring-boot-starter-test</artifactId>
            <scope>test</scope>
        </dependency>
    </dependencies>
    <build>
        <plugins>
            <plugin>
                <groupId>org.springframework.boot</groupId>
                <artifactId>spring-boot-maven-plugin</artifactId>
            </plugin>
        </plugins>
    </build>
</project>
P.S : spring-boot-devtools helps to disable the caches and enable hot swapping so that developers will always see the last changes. Good for development. Read this – Spring Boot – Developer tools.
Try to modifying the Thymeleaf templates or properties files, refresh the browser to see the changes take effect immediately.
Step 3: Create Main class and annotate as Spring Boot Application
Create a class with name SpringBootThymeleafWebAppApplication and add public static void main(String[] args) in it. Add class level annotation @SpringBootApplication. This class look as below
/****************************************************************************************
* Created on July 27, 2017 Copyright(c) https://kodehelp.com All Rights Reserved.
****************************************************************************************/
package com.kodehelp;

import org.springframework.boot.SpringApplication;
import org.springframework.boot.autoconfigure.SpringBootApplication;

@SpringBootApplication
public class SpringBootThymeleafWebAppApplication {

    public static void main(String[] args) {
        SpringApplication.run(SpringBootThymeleafWebAppApplication.class, args);
    }
}
Step 4: Create Hello World Controller
Create a controller class as shown below:
package com.kodehelp.controller;
import java.util.Map;
import org.springframework.beans.factory.annotation.Value;
import org.springframework.stereotype.Controller;
import org.springframework.web.bind.annotation.RequestMapping;
@Controller
public class HelloWorldController {
// This gets injected via application.properties
@Value("${welcome.message:test}")
private String message = "test";
@RequestMapping("/")
public String welcome(Map&amp;lt;String, Object&amp;gt; model) {
model.put("message", this.message);
return "helloWorld";
}
}Step 5: Create Thymeleaf Template + Resources + Static files
Add Thymeleaf templates in resources/templates folder.
<!DOCTYPE HTML>
<html xmlns:th="http://www.thymeleaf.org">
    <head>
        <title>Spring Boot Thymeleaf Hello World Example</title>
        <meta http-equiv="Content-Type" content="text/html; charset=UTF-8" />
        <link rel="stylesheet" th:href="@{/css/main.css}" href="../../css/main.css" />
    </head>
    <body>
        <nav class="navbar navbar-inverse">
            <div class="container">
                <div class="navbar-header">
                    <a class="navbar-brand" href="#">Spring Boot</a>
                </div>
                <div id="navbar" class="collapse navbar-collapse">
                    <ul class="nav navbar-nav">
                        <li class="active">
                            <a href="https://kodehelp.com">Home</a>
                        </li>
                        <li>
                            <a href="https://kodehelp.com">About</a>
                        </li>
                    </ul>
                </div>
            </div>
        </nav>
        <div class="container">
            <div class="starter-template">
                <h1>Spring Boot and Thymeleaf Template Engine Example</h1>
                <h2>
                    <span th:text="${message}"></span>
                </h2>
            </div>
        </div>
        <null>
            <script type="text/javascript"
                <script type="text/javascript" src="https://maxcdn.bootstrapcdn.com/bootstrap/3.3.7/js/bootstrap.min.js"></script>
    </body>
</html>- For static files like CSS or Javascript, put in
resources/static/
@import url("https://maxcdn.bootstrapcdn.com/bootstrap/3.3.7/css/bootstrap.min.css");- For properties files, put in /src/main/resources/
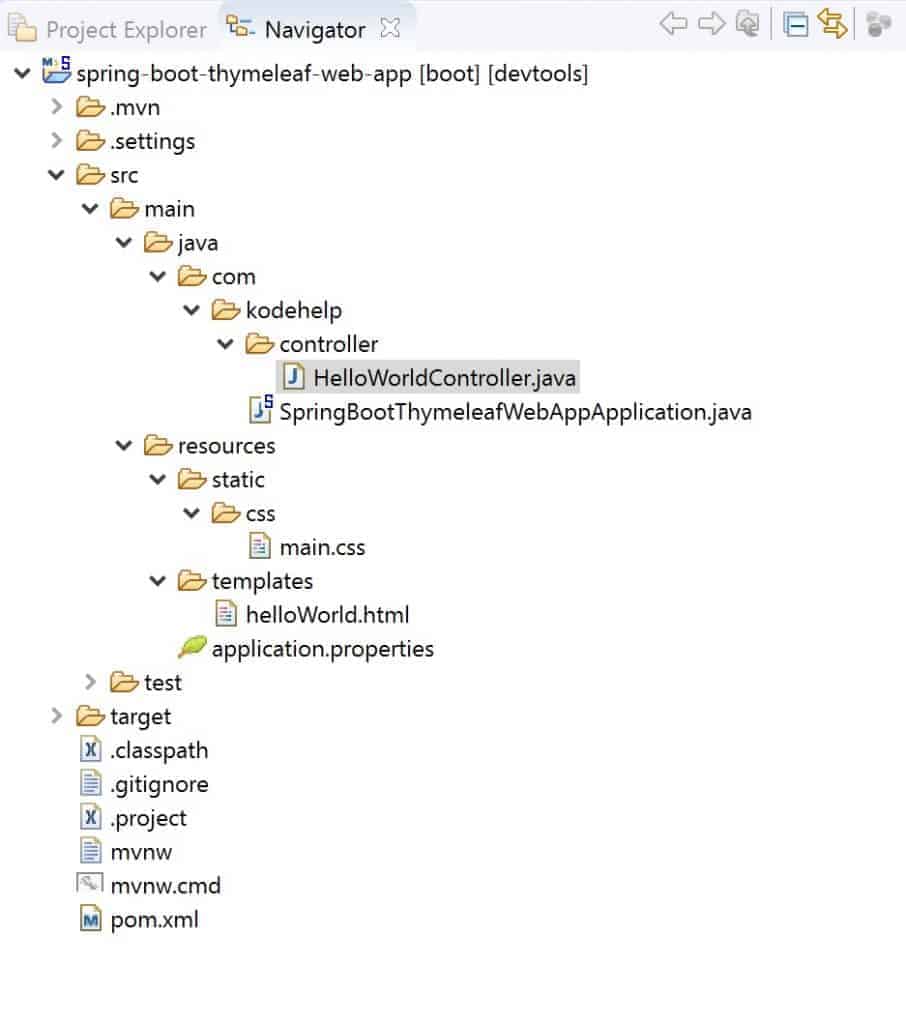
welcome.message: Hello World !! Welcome to https://kodehelp.com- The final folder structure in eclipse looks like below:
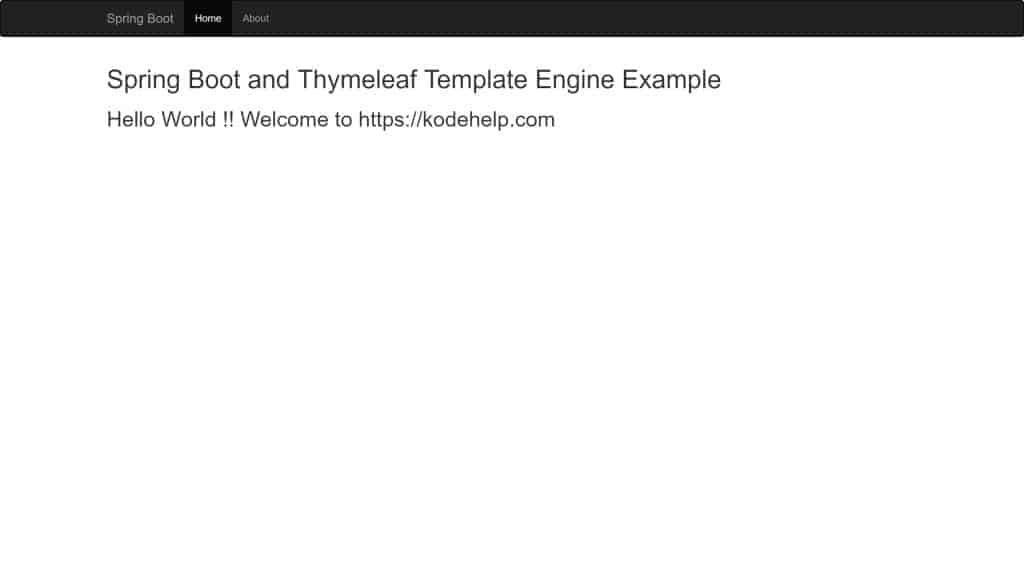
Step 6: Run the Application
- Run this application using the maven command
mvn spring-boot:runor by right-clicking on the eclipse project –> Run As –> Spring Boot App. - Once the embedded Tomcat server is started open this URL http://localhost:8080 in your web browser. This should open the welcome as shown below: